Poultry Advisory Services (PAS) Advisory Services
Broiler Management
Broiler is a strain of chicken which has been commercially bred specifically for meat production. Today’s broiler is a hybrid in genetic sense and is the cross of two pure breeds; Cornish (English breed) and Plymouth Rock (American breed). It is a four-line cross namely A, B C and D. Male is taken from A and B line cross having the characters of mostly White Cornish and female from C and D line cross having characters of mostly of Plymouth Rock. Due to narrow range of thermos-neutral zone it can only be grown in a proper environment related typically to this hybrid strain or in an environmental controlled house. Here are some managemental practices that is necessary for the better performance of broiler.
Chick Quality
Hatcheries can have a tremendous impact on the success of broiler production. Both hatching process and transportation from egg to farm, can be stressful for day old chick (DOC). Efforts to minimize stress are fundamental in maintaining good chick quality. Characteristics of a good quality chick should be;
- Well-dried, long-fluffed down.
- Bright, round, active eyes.
- Active and alert.
- Completely healed navels.
- Legs bright and waxy to touch.
- Free of red-hocks or swollen hock joints.
- Free from deformities (i.e. crooked legs, twisted necks. Missing toe and cross beaks etc.).
Table 01. Chick grading.
| Characteristic | (A) |
(B) |
(C) |
1. Reflex |
Chick can flip over |
Chick flips back over |
Over 10 seconds or fails |
2. Navel |
Clean and well healed |
Closed but slight |
Not closed/string/button |
3. Legs |
Clean, waxy legs |
Some dryness/pale |
Dehydrated with vein |
4. Hocks |
Clean, no blemishes |
Slight blushing |
Red color/heavy blushing |
5. Defects |
Clean, no blemishes |
Slight blushing |
Missing eye/blind, legs with |
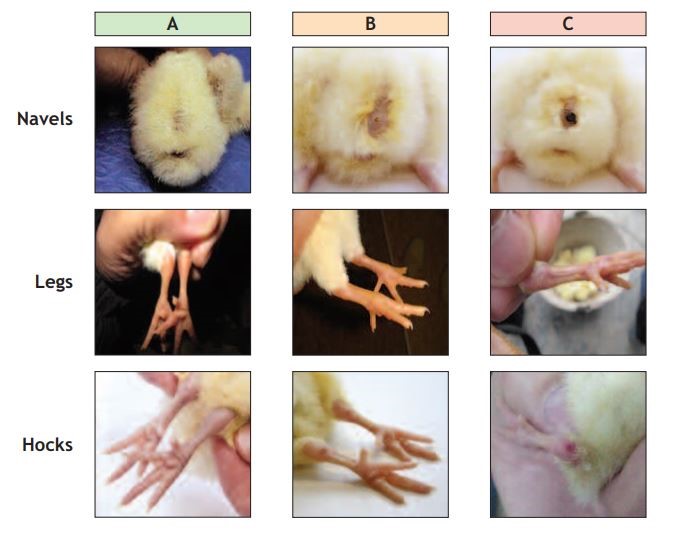
Figure 01. Chick anomalies.
Brooding Management
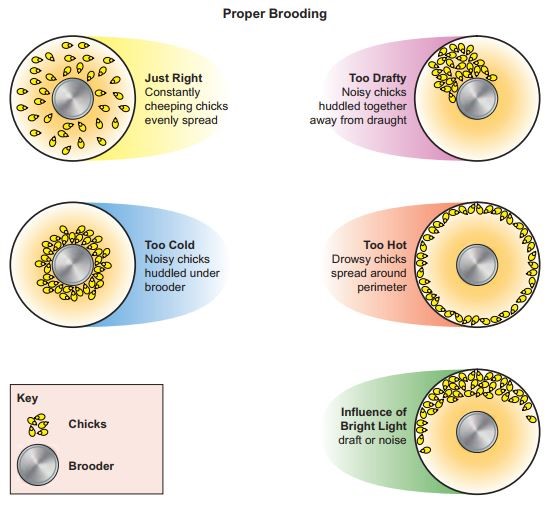
Figure 02. Different brooding management practices.
Importance of the brooding period cannot be neglected. First 14 days of a chick’s life set precedent for good performance as many of the important body system; immunity system; thermoregulation; digestive system; develop during this period. Extra effort during the brooding phase is rewarded in the final flock performance. Check chicks 2 hours after placement. Ensure they are comfortable. See the Proper Brooding Illustration (Fig 02).
Good farm management must strive to achieve brooding goals;
- Stimulate early feed and water intake
- Chicks should consume 40-50% of its own body weight in water after 24 hours of placement.
- Accelerate growth (04.6 times minimum growth rate 0-7days of age with target body weight 190g at 07th day).
- Skeletal, cardiovascular, gut development
- Flock uniformity (CV below 10 or uniformity above 68%)
- Without faultless brooding, performance will be compromised!
- This is the birds’ most efficient period (FCR better than 1:1)
- Ensure temperature regulation development during first 5 days
- First 4 days is over 12% of a 2kg broiler’s life, and is increasing each year
- The key is to achieve all of the above with Minimal Stress
- More Effort during brooding = Better Rewards in final flock performance
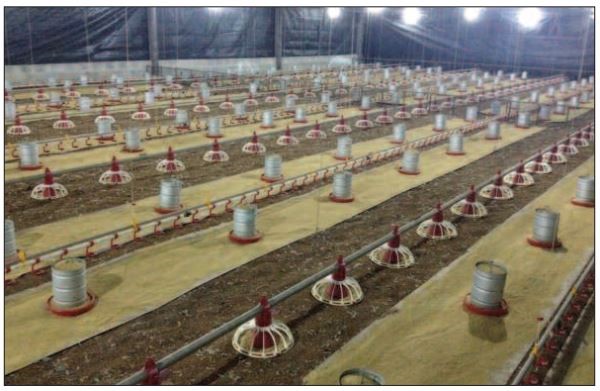
Brood Area
Chick stock density will depend on the brooding area being utilized. It will also depend on age of the bird (Table 01). Initial stocking should not exceed more than 50 – 60 birds/m² during the winter and 40 - 50 birds/m² during the summer. Ensure adequate supplement drinkers (01 drinker for 80 chicks) along with nipple or bell drinkers. Drinking space must not exceed 25 birds per nipple. Generally, the house should be totally open after 14 days of age.
Table 01. Brood chamber stocking density.
| Age (days) | Density (birds/m²) |
0 to 3 |
55 to 60 |
4 to 6 |
40 to 45 |
7 to 9 |
30 to 35 |
10 to 12 |
20 to 25 |
13 to 15 |
10 to 15 |
Table 02. Different stocking densities and equipment during different ventilations.
| House Type | Ventilation Type |
Equipment |
Maximum Stocking Density |
Open Sided |
Natural |
Stir Fans |
30 kg/m² (6.2 lb/ft²) |
Open Sided |
Positive Pressure |
Side wall fans @ 60° |
35 kg/m² (7.2 lb/ft²) |
Solid Wall |
Cross Ventilation |
European Set-up |
35 - 42 kg/m² |
Solid Wall |
Tunnel Ventilation |
Foggers |
39 kg/m² (8.0 lb/ft²) |
Solid Wall |
Tunnel Ventilation |
Evaporative Cooling |
42 kg/m² (8.6 lb/ft²) |
Table 03. Temperature guide.
| Age (days) | Relative humidity (%) |
Temperature °C (°F) (for chicks from 30-week-old parent flocks or younger) |
Temperature °C (°F) (for chicks from 30-week-old parent flocks or older) |
0 |
30-50 |
34 (93.2) |
33 (91.4) |
7 |
40-60 |
31 (87.8) |
30 (86.0) |
14 |
40-60 |
27 (80.6) |
27 (80.6) |
Crop Fill Evaluation:
The main objective of management during the first hours after placement on the farm is to achieve as much intake of both feed and water in as many chicks as possible. Failure to achieve this objective will lead to irreversible and compromised flock performance, which will be expressed as poor growth, poor feed conversion and poor flock uniformity. Different management aspects as following can help to understand the possible failure in preliminary feeding;
- Temperature of chicks’ feet is an excellent indicator of floor temperature.
- If the chick’s feet are cold, the internal body temperature of the chick is also reduced.
- Cold chicks will be seen huddling with reduced activity, resulting in reduced feed and water intake.
- By placing the chicks’ feet against your neck or cheek one can readily learn how warm or cold the chick is?
- If they are warm, chicks should be evenly and actively moving around the brooding area.
- Crop-filled test after eight hours of placement should be a minimum of 85% ratio (both feed and water should be present in crop).
- A minimum of 95% of the bird’s crops should be filled upon examination after 24 hours of placement.
- After 24 hours of placement, chick should consume 20-25% of its own body weight in feed.
Evaluate crop fill and indicate results on form as below:
| Crop fill | No. of chicks |
Full - Pliable |
Full - Hard |
Full - Soft |
Empty |
Evaluation |
- Sample 100 chicks per brood area.
- Check: temperature of feet against neck or cheek.
- If the feet are cold, re-evaluate pre-heating temperature.
Once the chick has eaten: digestion and heat production start, risk of being cold is reduced and temperature control begins. And vice versa is possible if chicks do not start eating feed.
Drinker Check:
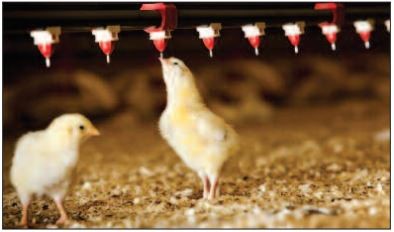
- 14-16 drinkers/1,000 chicks (includes supplemental) should be provided within the brooding area of which 8-10 can be of bell-type drinkers.
- All drinkers should be flushed to remove any residual sanitizer or bio-film.
- Adjust pressure to produce a droplet of water visible on each nipple, without dripping.
- Check for water leaks and air locks.
- Ensure that nipple drinkers are at the chicks’ eye level.
- Water must be cool (20 centigrade), clean and fresh.
- Supplemental drinkers should be placed in such a way that the chicks will make association between supplemental drinkers and the primary source of water.
Feeder Check:
- Remove all water remaining from clean-out feeders prior to filling.
- Where full house brooding is practiced, 75 g of feed per chick should be placed on the papers. The feed and paper need to last for at least 96 hours post placement.
- Where partial house brooding is practiced, supplementary feed should be provided for the first 7 days in the form of turbo feeders / trays and papers.
- Turbo feeders should be provided at a rate of at least one per 75 chicks.
- Trays should be provided at a rate of one per 50 chicks.
- It is of utmost importance that the supplementary feeding system does not run empty.
- The base of the supplementary feeders should never be exposed - keep full at all times!
- Supplemental feeders should be refreshed three times daily until all the chicks are able to gain access to the main feeding system.
- Feed should be provided as a good quality crumble.
- Do not place feed or water directly under the heat source as this may reduce feed and water intake.
- The automatic system should be placed on the floor to make access easier for the chicks. Where possible, flood the automatic feeding systems with feed.
- When using paper, the feed area should be a minimum of 50% of the brooding area. Paper should be placed near the automatic drinking system so that the chicks have easy access to both feed and water.
- It is ideal to have a row of paper on either side of each drinker line.
Air Quality:
The very first purpose of ventilation is the proper amount of gaseous exchange inside the house to help the chick in-hale and ex-hale right amount of air. Normal air quality guidelines (Table 04) must be followed through proper ventilation from the day one.
| Particulars | Normal Range |
Oxygen |
19.6% |
Carbon dioxide |
<0.3% or 3000ppm |
Carbon monoxide |
<10ppm |
Ammonia |
<10ppm |
Inspirable dust |
<3.4mg/m2 |
Relative Humidity |
45-65% |
Table 04. Daily Growth Performance Objectives:
| Day | Body Weight (g) |
Weight Gain (g) |
Avg. Daily gain/week (g) |
Feed Intake (g) |
Cum. Feed Intake (g) |
0 |
43 |
||||
1 |
61 |
18 |
12 |
||
2 |
79 |
18 |
17 |
29 |
|
3 |
99 |
20 |
21 |
50 |
|
4 |
122 |
23 |
24 |
74 |
|
5 |
148 |
26 |
28 |
102 |
|
6 |
176 |
28 |
32 |
134 |
|
7 |
208 |
32 |
23.5 |
36 |
170 |
8 |
242 |
34 |
40 |
210 |
|
9 |
280 |
38 |
45 |
255 |
|
10 |
321 |
41 |
49 |
304 |
|
11 |
366 |
45 |
54 |
358 |
|
12 |
414 |
48 |
58 |
416 |
|
13 |
465 |
51 |
63 |
479 |
|
14 |
519 |
54 |
44.46 |
69 |
548 |
15 |
576 |
57 |
74 |
622 |
|
16 |
637 |
61 |
79 |
701 |
|
17 |
701 |
64 |
85 |
786 |
|
18 |
768 |
67 |
90 |
876 |
|
19 |
837 |
69 |
96 |
972 |
|
20 |
910 |
73 |
102 |
1074 |
|
21 |
985 |
75 |
66.65 |
108 |
1182 |
22 |
1062 |
77 |
114 |
1296 |
|
23 |
1142 |
80 |
120 |
1416 |
|
24 |
1225 |
83 |
125 |
1541 |
|
25 |
1309 |
84 |
131 |
1672 |
|
26 |
1395 |
86 |
137 |
1809 |
|
27 |
1483 |
88 |
143 |
1952 |
|
28 |
1573 |
90 |
84.07 |
149 |
2101 |
29 |
1664 |
91 |
154 |
2255 |
|
30 |
1757 |
93 |
160 |
2415 |
|
31 |
1851 |
94 |
165 |
2580 |
|
32 |
1946 |
95 |
170 |
2750 |
|
33 |
2041 |
95 |
175 |
2925 |
|
34 |
2138 |
97 |
180 |
3105 |
|
35 |
2235 |
97 |
94.47 |
185 |
3290 |
36 |
2332 |
97 |
189 |
3479 |
|
37 |
2430 |
98 |
194 |
3673 |
|
38 |
2527 |
97 |
198 |
3871 |
|
39 |
2625 |
98 |
202 |
4073 |
|
40 |
2723 |
98 |
206 |
4279 |
|
41 |
2821 |
98 |
209 |
4488 |
|
42 |
2918 |
97 |
97.67 |
213 |
4701 |
Broiler Vaccination Schedule
Schedule -1 (For good and single sites) |
||||||
Age (Days) |
Vaccination details |
|
||||
0 |
IB spray |
Massachusetts |
||||
5-6 |
ND |
LaSota |
||||
7 |
--- |
|
||||
12 |
IBD |
Precise /D-78 |
||||
16-18 |
ND |
Clone |
||||
Schedule -2 (For Good sites having double sheds) |
||||||
Age (Days) |
Vaccination details |
|||||
0 |
ND+IB |
Massachusetts + Clone 30 |
||||
5-6 |
---- |
|
||||
7 |
ND |
Clone 30 |
||||
12 |
IBD |
Precise /D-78 |
||||
16-18 |
ND |
Clone 30 |
||||
Schedule-3 (For Notorious sites) |
||||||
Age (Days) |
Vaccination details |
|||||
0 |
IB spray |
Massachusetts |
||||
5-6 |
ND |
Clone |
||||
7 |
ND |
Injection (killed) |
||||
12 |
IBD |
Precise /D-78 |
||||
16-18 |
ND |
Clone |
||||