Poultry Advisory Services (PAS) Advisory Services
Broiler Breeder Farming
 The commercial broiler breeders are the product of intense genetic selection over the years. The breeding companies are committed to perform a continuous genetic improvement to increase the performance potential in all areas of broiler and broiler breeder production. However, to attain both genetic potential and consistent flock production, it is important that the flock manager has a good management program. Management must meet the basic needs of the flock but also adjust the program to benefit fully from the breed’s potential.
1. Biosecurity on the Farm
Biosecurity must encompass all the operations performed by the breeding stock caretaker. Procedures to prevent the introduction and spread of disease or contamination must be implemented at the hatchery, feed mill, farm operations, general maintenance and by personnel. An issue in any area will endanger the whole biosecurity program and the general wellbeing and productivity of the flock. All personnel must understand the importance of the biosecurity program. Biosecurity essentials include:
a. Animal and bird contact
- The farm team must not have contact with other birds, and possessing backyard birds is not allowed
- All team members must sign an agreement to avoid and not possess birds.
- Respect all required “no contact time” for any noncompany bird contacts. Exposure to non-company flocks or birds must require a minimum of 72 hours of no contact before re-entering flocks, especially if disease threats are active in the area.
- No pet animals should be allowed in or around the poultry housing.
- Farm animals other than poultry should be fenced separately and accessed via a separate entrance.
b. Farm team hygiene
- Ideally a ‘shower-in and shower-out’ policy is regarded as best practice including a timed, five-minute, hot shower with the necessary cleansing and sanitizing agents which must be provided.
- Use dedicated changing facilities located at the site entrance for employees and visitors and provide protective clothing and footwear.
- Only essential items are permitted on the farm. Personal items such as jewelry, phones and watches are discouraged. All items that enter the farm must be disinfected.
- Use boot dips and sanitize hands prior to flock contact.
- Catching, vaccination and selection crews should be provided with protective clothing.
- Do not dry farm clothes in open air. Use of gas or electric dryers should be a protocol.
c. Visitors
- Everyone entering the premises must register and answer a questionnaire before entering. Keep a record of all approved visitors and their previous farm visits and/or bird contact.
- If delivery vehicles enter the farm, they must be washed and disinfected at the farm entrance. A wash bay with wheel dips and spraying facilities should be located at the farm entrance.
- All outside equipment should be thoroughly cleaned and disinfected before it comes onto the farm, and again upon arrival at the receiving house.
- Incoming traffic must be minimized.
- Any visitors who need to enter the farm must shower and change into a clean uniform. Since shower facilities can be a biosecurity risk, it is important that they are kept clean and sanitized, with designated “clean” and “dirty” zones.
- Catching equipment such as crates/modules and forklifts must be washed and disinfected before entry to the farm.
d. Disease prevention
- Dispose of mortality in the correct and hygienic manner daily.
- Water should be obtained from known clean sources and not from open water supplies.
- Have a written plan in place to address disease outbreaks.
e. Flock housing
- Use assigned areas for boot changing stations before entering the houses.
- Keep all doors shut and well-sealed to prevent rodent entry.
- Disinfect all equipment and supplies prior to entering the houses.
- Use wild bird proofing equipment and materials and rodent traps and barriers.
f. Feed
- Clean feed spills immediately to reduce risk of vermin (wild bird, rodent) near the farm.
- Use clean raw materials and heat / chemically treat to prevent Salmonella. Follow local legislation on type of treatment allowed.
- Manage feed bins and feed systems to keep feed and systems clean and prevent mold.
- Feed delivery best practice is a feed silo outside the farm perimeter fence. Dedicated farm vehicles should move the feed from the outside silo to each house.
g. Litter
- Ideally the manufacturer should heat treat litter for drying purposes, as well as, disinfection.
- Litter material should be kept covered at every stage from manufacturer to farm.
- Litter should be stored in a secure facility that is rodent and bird proof. Treat the litter with an approved disinfectant or organic acid.
- Source new material from known approved suppliers.
- Dispose of used litter in accordance with local legislation.
2. Brooding Design and Management
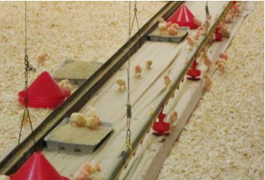
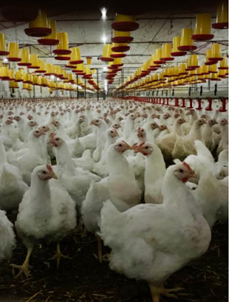
The goal of the brooding chamber design and management is to increase the size of the brooding area as quickly as possible, while maintaining the correct house temperature. Heat and ventilate the unused area to the correct temperature at least 24 hours prior to expanding the brooding area. Generally, the rearing house partitions should be completely open after 14 to 16 days, varying according to the final density capacity and the house structure conditions. The placement density in the brooding chamber will depend on the size of the brooding area and the equipment. Initial stocking should not exceed more than 55 to 60 birds per m² (0.18 to 0.20 ft2 per bird). Ensure adequate drinking space, especially during summer placements - calculate 40 birds per nipple if nipples are easily activated.
Stocking density recommendations during the growing period |
||
Time frame |
birds per m2 |
birds per ft2 |
Pullets in rearing |
||
open sided rearing |
6 |
1.79 |
dark out rearing* |
7-10 |
1.54-1.08 |
Production |
||
floor-open sided |
5-5.5 |
2.15 to 1.96 |
floor-tunneled |
5.5 |
1.96 |
floor-tunneled with pad cooling |
6.0 |
1.79 |
slatted - EU style |
6.0-7.0 |
1.79 to 1.54 |
slatted - US style |
5.5 |
1.96 |
Males in Rearing |
||
open sided rearing |
2.5 |
4.3 |
dark out rearing* |
3.0 |
3.6 |
Lighting during brooding

Objectives to be achieved during rearing management
Rearing phase |
Time Frame (Weeks) |
Important factors relating to bodyweight within the time frame |
1 |
0-4 |
Brooding and rearing factors have a critical impact on frame size and uniformity for the life of the flock. |
2 |
4-8 |
Important for the establishment and correction of flock uniformity. |
3 |
8-12 |
During this stage the birds should have a carefully controlled feeding program and be closely monitored to prevent them from becoming over weight and over fleshed. |
4 |
12-16 |
Puberty begins and the birds will slowly start to increase their fleshing and overall conditioning. |
5 |
16-20 |
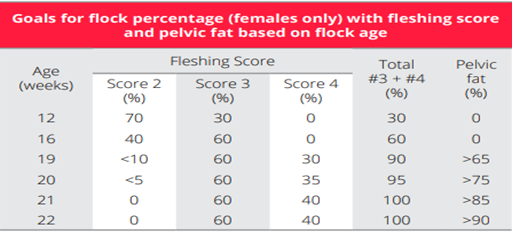
Considerable increase in growth rate “turn up” to prepare for sexual development and achieve the desired uniformity and fleshing. By 20 weeks of age, abdominal fat reserves should be developing. These reserves are independent of bodyweight but closely linked to the female fleshing score. |
Feed types by formulation based on age and their functions
| Feed | Age |
Function |
Starter |
0 to 4 weeks |
This feed is designed to achieve the bodyweight standards and skeletal structure of the bird. With the low feed intake capacity the first week, higher density feeds (2850 energy kcal/kg (11.88 Mj/kg), 19 % crude protein and 0.93 % dig. Lysine) are recommended to achieve desired nutrient intake. It is recommended to present this feed as a crumble. |
Grower |
5 to 15 weeks |
This feed can be very flexible based on the feeding program and is intended to help maintain and achieve small weight gains. Flocks with the current nutrient feeds are normally fed using an alternative feeding program. If an everyday program is required, adjust feed to provide more volume with good fiber ingredients for lower levels of energy and amino acids. Energy 2700 kcal/kg, (11.25 Mj/kg), 14.5 % protein and 0.60 dig. Lysine is formulated based on research and best flock performance. |
Developer |
16 weeks to 1st egg |
The energy of this feed is intended to help deposit fat and protein giving the bird reserved energy to reduce the stress of photo stimulation, improve onset of lay, and, most importantly, for persistency of lay after 40 weeks. It is important to transition to this feed at 16 weeks and recommended to use this feed until 1st egg or 5 % production. Energy 2800 kcal/kg, (11.67 Mj/kg), protein 15 % and dig. Lysine 0.63 % are recommended. Calcium is increased from 0.95 to 1.20% to support storage of calcium. Some growers skip this feed for practical issues and keep feeding the lower density feed when the purpose of this stage is to prepare the pullet for photo stimulation. |
Breeder 1 |
1st egg to 38 weeks |
This feed is intended to help bird maintenance, bodyweight increase, and energy for egg production while feed amount is increased toward peak production. Transition from Developer to Breeder 1 feed by 1st egg in the flock and no later than the 3 to 5% daily egg production. Any further delay in Breeder 1 consumption will deplete bone calcium reserves in “early maturing” hens. This in turn could lead to increased hen mortality and is a commonly seen issue in flocks. Energy 2800 kcal/kg, (11.67 Mj/kg), protein 15 %, dig. Lysine 0.63 %, and Ca increases from 1.2 to 3 % to support egg production. |
Breeder 2 |
38 weeks + |
Breeder 2 has lower amino acid levels than Breeder 1 but the same amount of energy, as an extreme withdrawal of energy can affect production. This may occur during the normal practice of post peak feed reduction which is done to control excess bodyweight gain. Experience and research with lower energy in this phase has shown loss of feathers and drop in production. Calcium also increases to 3.2 % to prevent calcium depletion associated with a reduction of feed intake and maintain eggshell quality. Introducing Breeder 2 feed when egg weight is at 60 g for fast feather and 62 g for slow feather females can be an efficient way to control bodyweight and egg weight |
Male Feed |
24 weeks + |
The male feed has less energy and amino acids than other feeds, 2700 kcal/kg, (11.25 Mj/kg), protein 13 %, and dig. Lysine 0.50 %, providing more volume to males to maintain uniformity of weight and condition during mating. The males are more efficient at converting feed than females, so a bulky feed is needed. Any deficiency of vitamins and minerals can cause issues due to the low feed intake. |

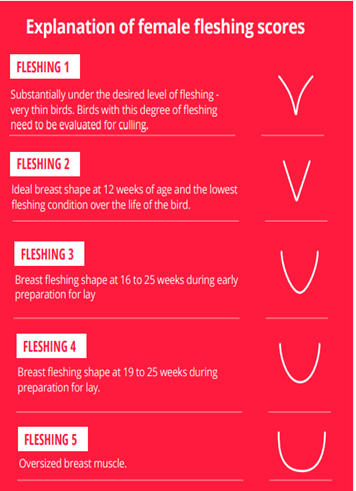
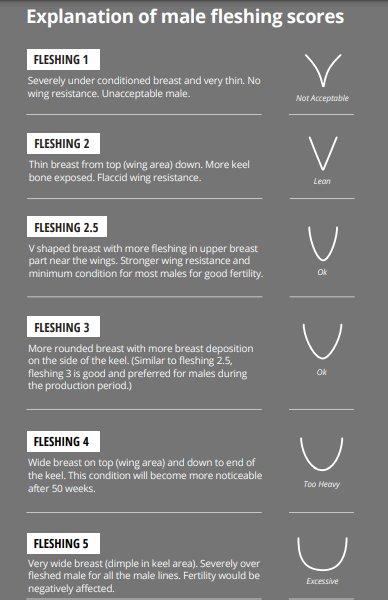
Fleshing and Body weight management
Nesting systems
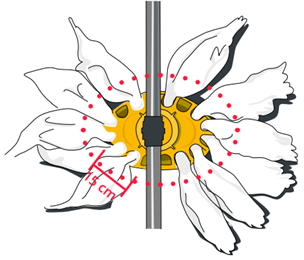
Manual nest systems Manual nesting systems are still popular in regions of the world with lower labor costs. These systems should provide 1 nest for 4 hens. The nest boxes must have solid bottoms and be well-maintained so it is the most attractive place in the house for the birds to lay eggs. The nest should be bird friendly, have clean and dry bedding and provide environmental comfort for the hen. The ideal nest size is 25 cm (9 7/8 in) long, 30 cm (11 7/8 in) high and 25 cm (9 7/8 in) deep, so females feel protected. In addition, the instep should be at least a 15 cm (6 in) high. Fill the nests with material that is a minimum 1/2 to a maximum 2/3 of the instep height for the hen to make a concave nest. Overfilling the nests will make them less attractive and hens will kick out the expensive nest material. The maximum height to jump to the perches to get into the nest should be around 45 cm (18 in). Egg collection should be done frequently to prevent having more than 3 eggs per nest because this can induce pre-incubation and broken eggs.
S. NO |
AGE |
VACCINE |
Type |
Specification |
ROUTE |
1 |
1 |
ND+IB |
Live |
Simple |
SPRAY HATCHERY |
2 |
7 |
ND+IB+IBD |
Killed |
Simple |
Injection |
3 |
7 |
Coccidiosis |
Live |
|
Oral Drop |
4 |
10 |
ND |
Live |
Avinew |
Drinking Water |
5 |
10 |
IBD Precise |
Live |
Intermediate |
Oral Drop |
6 |
18 |
H-9 |
Killed |
|
Injection |
7 |
25 |
IB |
Live |
H-120 |
Drinking Water |
8 |
25 |
HPS |
Killed |
Type 4,6,8 |
Injection |
9 |
35 |
POX |
Live |
|
Wing Web |
10 |
45 |
ND |
Live |
Lasota |
Drinking Water |
11 |
56 |
IB |
Live |
Mass |
Drinking Water |
12 |
63 |
ND+H-9 |
Killed |
|
Injection |
13 |
77 |
ILT,SHS |
Live |
|
Drinking Water |
14 |
84 |
EDS |
Killed |
For Males |
Injection |
15 |
90 |
ND |
Live |
Lasota |
Drinking Water |
16 |
94 |
IB Variant |
Live |
4.91 |
Drinking Water |
17 |
110 |
H-5 & H-7 |
Killed |
Local |
Injection |
18 |
117 |
ND+IB Variant |
Killed |
IB Variant |
Injection |
19 |
125 |
H-5 & H-7 |
Killed |
Imported |
Injection |
20 |
133 |
IBH & IBD |
Killed |
IBD for Female |
Injection |
21 |
140 |
( ND+IB) H-9 |
Killed |
H-9 Local |
Injection |